Building a Hyperliquid Client in Python – Part I
A practical, developer-focused introduction to building a Python client for Hyperliquid perpetual futures from scratch. Covers core concepts like APIs, orderbooks, and perps while setting up the foundation for querying data and interacting with the exchange.
Posted by
Related reading
Building a Hyperliquid Client in Python – Part III
Part III of the Hyperliquid client series covers private API endpoints, secure EIP-712 signing, and comprehensive order management. It offers practical guidance for account functions, error handling, and safe Testnet experimentation before transitioning to Mainnet.
Building a Hyperliquid Client in Python – Part II
This hands-on continuation of the Hyperliquid client series focuses on implementing and using public /info endpoints. It details key data retrieval functions such as funding rates, candlesticks, and order books, and establishes a foundation for robust, production-ready API interactions.

In this article, I’ll build a Python client for Hyperliquid perpetual futures from scratch. Although libraries like CCXT and the Hyperliquid Python SDK exist, implementing our own client deepens our understanding of APIs, signing, and exchange-specific details while giving us complete control over execution logic.
This series focuses on perpetual futures (perps), but the same client structure applies to Hyperliquid Spot with only minor adjustments. The key differences are: spot symbols come from spotMeta.universe, and balances from spotClearinghouseState. There is no leverage or margin for spot, and order submission uses the same signing flow.
Note: I am a researcher, not a software engineer. The code provided is functional and tested, but it’s intended as a research prototype, not a production system.
This article is for educational purposes only. Perpetual futures are risky, especially with leverage; you can lose more than your initial investment. None of this is financial advice.
What is Hyperliquid?
Hyperliquid (https://app.hyperliquid.xyz) is a decentralized exchange (DEX). A DEX is a platform that enables peer-to-peer trading of cryptocurrencies without the need for a central intermediary. Trades happen directly between users, typically using smart contracts on a blockchain.
The team behind Hyperliquid originally started in 2020 as Chameleon Trading, a crypto market-making firm led by Jeff Yan. Hyperliquid, launched in 2023, initially focused on perpetual futures and offers a fast matching engine, clean API, and unique features like API agent wallets (for signing) and vaults (pooled capital managed by a leader).
Unlike most DEXs, Hyperliquid does not use an Automated Market Maker (AMM). Instead, it runs a central limit orderbook (CLOB) directly on-chain, and it does not outsource the orderbook to an off-chain sequencer.
An AMM is a smart contract holding two tokens in a liquidity pool, using a pricing formula to quote trades. Traders swap against the pool rather than against other traders' orders. This design works well on general-purpose blockchains like Ethereum, where live on-chain orderbooks would be too slow or costly.
The trade-off is that while AMMs are simple and decentralized, they can be less efficient: spreads and slippage depend on pool depth, and liquidity providers face risks like impermanent loss. As a result, most DEX trading in tokens happens on AMMs, and perp protocols usually rely on off-chain orderbooks.
Hyperliquid uses a custom, high-performance Layer-1 blockchain where both the orderbook and matching engine are built-in, on-chain systems. Every order is posted and settled on-chain by network consensus, combining exchange speed with blockchain transparency.
This series covers querying balances, building and sending signed orders, managing open orders, plus a few helpers.
Introduction to Futures and Hyperliquid Perps
Futures are agreements to buy or sell an asset at a set price. In crypto, perpetual futures (perps) are the dominant form: like traditional futures, they let you speculate on price without owning the asset, but unlike dated futures, they have no expiration.
Instead of expiring, perps use a funding rate paid between long and short positions to keep perp price near spot. Hyperliquid uses a funding rate on an hourly schedule.
Perps are traded on margin (collateral), which makes them inherently leveraged. On Hyperliquid, you set leverage per asset, and your profit and loss (PnL) is marked to market continuously.
Hyperliquid perps are quoted in USD and settled in USDC. For Bitcoin, BTC/USD, BTC-USD, BTCUSDC, or simply BTC all refer to the same product. In this series, the short form is used.
What is an API?
An API (Application Programming Interface) lets software interact with other software. In trading bots, exchange APIs enable fetching data, managing orders, and checking balances, all without the trading UI.
With an API client, you send structured requests to the exchange and get structured responses, enabling automation and systematic trading.
REST API vs WebSocket API
Hyperliquid exposes both REST and WebSocket interfaces. They serve different needs and complement each other.
The REST API works over HTTP for placing/canceling orders, adjusting leverage/margin, querying account or vault state, pulling snapshots (order book, mid-prices), and fetching historical data. It’s simple, stateless, and ideal for most workflows.
The downside is that for "live" data, you’d need to poll repeatedly, which is fine for many strategies but not ideal for ultra-low-latency use.
The WebSocket API provides a persistent, real-time connection. Once subscribed, Hyperliquid pushes updates to you: order book changes, trades, mid-prices, and private events like your order and position updates. It reduces latency and bandwidth versus constant polling and is preferred for latency-sensitive systems.
In this series, the client is built around the REST API only to keep the code straightforward while covering everything needed for trading.
API Endpoints
Hyperliquid’s REST surface is intentionally simple:
/info: read-only endpoints (e.g.,meta,clearinghouseState,openOrders,l2Book,allMids,candleSnapshot, etc.)./exchange: signed actions (e.g., place/cancel orders, set leverage, update isolated margin). These use an EIP-712 Agent signature (EIP-712 is an Ethereum standard for signing structured messages) from your API agent wallet; optionally includevaultAddressto route actions to a vault. We’ll cover the exact signing and payload shape when we wire up/exchange.
An API agent wallet is a lightweight keypair generated in the Hyperliquid app to trade programmatically. It can sign actions (orders, cancellations, leverage updates) via EIP-712, but can’t transfer funds. This separation makes it safer than using your main wallet for API trading.
Mainnet and Testnet
Hyperliquid offers two environments: Mainnet and Testnet. Mainnet is the live venue where real capital and market conditions apply. Testnet is a sandbox to develop and test your client, signatures, and order flow without risking real funds.
In both environments, you’ll typically create an API agent wallet in the UI. You can also create a vault to simulate pooled capital. In code, I’ll pass a flag is_mainnet=False to switch the base URL automatically.
Mainnet
REST base URL: https://api.hyperliquid.xyz
WebSocket base URL: wss://api.hyperliquid.xyz/ws
Testnet
REST base URL: https://api.hyperliquid-testnet.xyz
WebSocket base URL: wss://api.hyperliquid-testnet.xyz/ws
To fund the Testnet account, you will first need to have funded your Mainnet account.
How to set up an account in Hyperliquid
To get started, you need a Hyperliquid account. Unlike Binance, Hyperliquid is wallet-native, so you connect an EVM-compatible wallet (such as MetaMask) instead of creating a username/password.
- Go to app.hyperliquid.xyz and connect your wallet.
- Once you have connected your wallet, you can create your API keys, as explained later.
- If you’re just testing, switch to testnet and claim test USDC from the faucet (once you have made a deposit on mainnet).
- Optionally, create a vault if you want to simulate pooled capital managed by your strategies.
Once you have an API wallet private key and (test) USDC in your account, you’re ready to configure the Python client.
What is an EVM-compatible wallet?
EVM stands for Ethereum Virtual Machine, the computation engine that powers Ethereum and many other blockchains (Avalanche, Polygon, Arbitrum, etc.). An EVM-compatible wallet is simply a wallet that understands how to interact with any chain that uses the Ethereum standard for accounts, keys, and transactions.
MetaMask is a common EVM wallet that runs as a browser extension or mobile app. With MetaMask, you control an Ethereum-style address (your public key) and its associated private key. You can use the same wallet to connect to Ethereum mainnet, testnets, and any EVM-compatible chain by switching networks.
Hyperliquid is not built on Ethereum; it runs its own high-performance Layer-1 blockchain, but is EVM-compatible. You can use MetaMask or another EVM wallet to connect as you would with Ethereum, so your usual wallet tools still work.
No KYC
Unlike most centralized exchanges, Hyperliquid does not require KYC (Know Your Customer). You connect directly with an EVM-compatible wallet, deposit USDC, and you’re ready to trade.
Advantages: onboarding is fast, global, and preserves privacy. You don’t need to share identity documents or wait for approvals, which makes it easier to experiment and lowers the barrier to entry.
Disadvantages: the flip side is that you’re operating in a regulatory gray area. Some jurisdictions may not allow un-KYC’d derivatives trading, and without KYC, you don’t have the same consumer protections or fiat on/off ramps as a regulated exchange.
Disclaimer: This section is for educational purposes only and should not be taken as legal advice. Regulatory requirements vary by jurisdiction. Always check the rules that apply to you before trading derivatives on any platform.
API Keys
The process of getting Testnet and Mainnet API keys is identical. Here I will just show Testnet examples.
First go to More > API. The image below shows the interface.
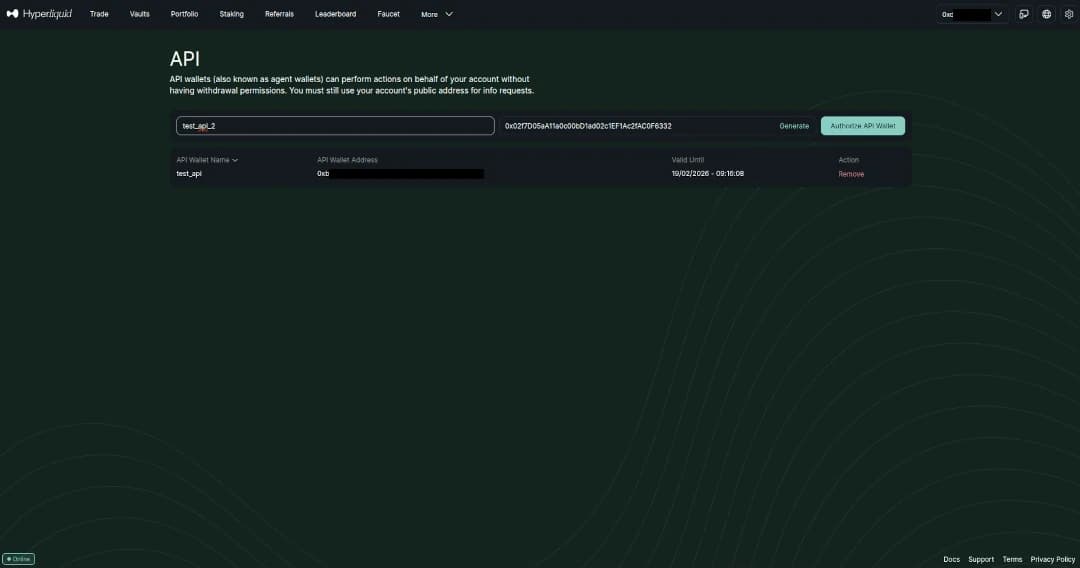
Give a name to your keys and click Generate. Then click Authorize API Wallet and you will see the following screen.
Note: For demonstration purposes, the screenshot below shows a private key, but I never actually authorized or created it. This way I can safely illustrate the process without exposing a real key. When you generate your own API wallet, make sure to keep the private key secret and store it securely; anyone with access can trade on your behalf.
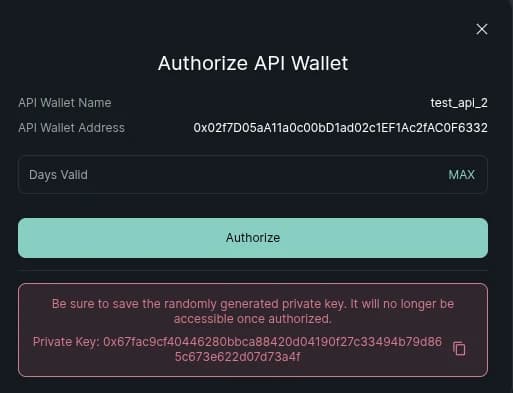
You need to copy your private key before you click Authorize.
Vaults
One of Hyperliquid’s unique features is the concept of vaults. A vault is like an on-chain managed account: a leader creates it, deposits some collateral, and then other users can deposit capital into the vault. The vault trades as a single account, and profits and losses are shared among all depositors.
As a developer, interacting with a vault is almost the same as trading from your own account. The only difference is that when you post a signed action to /exchange, you include the vaultAddress. Hyperliquid handles the rest. You can query balances, positions, and open orders for a vault exactly as you would for a personal account.
This design makes vaults a powerful primitive: leaders can run strategies at scale, and depositors can participate without handing over custody of their funds. It’s a feature that sets Hyperliquid apart from most centralized and decentralized exchanges.
Creating a vault is a simple process. Just go to the Vaults menu, and you will get the following screen (I am using my Testnet to exemplify, but the Mainnet process is identical):
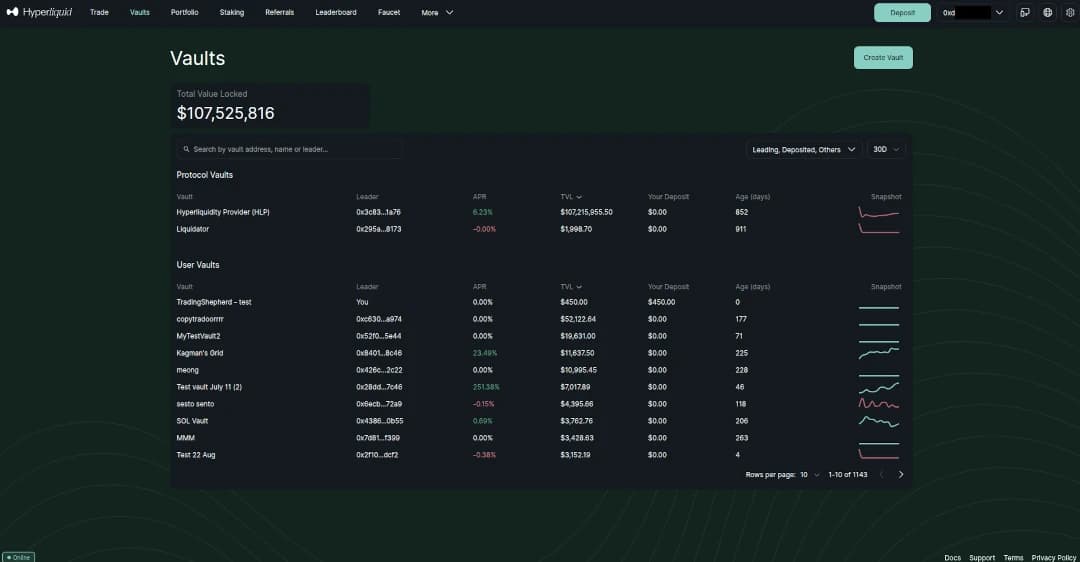
Now connect your wallet and press Create Vault, you will get the following screen:
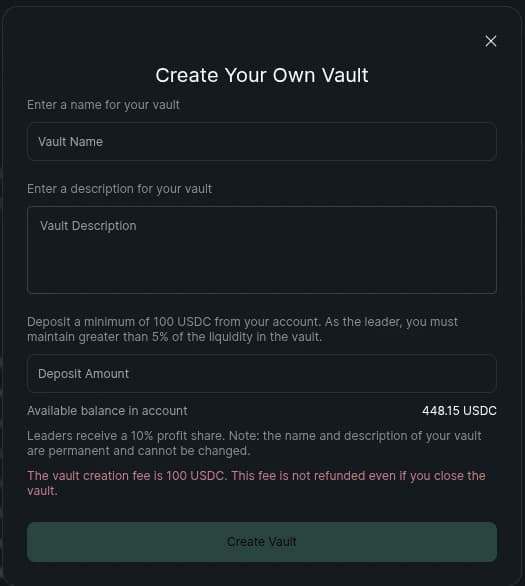
Enter a vault name and a vault description. Finally, decide on an amount to deposit into the vault and press Create Vault.
Conclusion
With that, Part I of the "Building a Hyperliquid futures client" blog comes to an end. To provide a complete perspective, let me preview what's next in this series.
In Part II, I will shift focus to the /info endpoint public-side requests that I find most useful, building on what we've covered so far.
Looking further ahead, Part III will address the private /info functions functions alongside the /exchange functions, which require signatures. This will include account status checks, setting leverage and margin, placing and canceling orders, and reviewing trades and positions, helping you advance to more complex operations.
Want deeper insights into risk and trading strategies? Subscribe to Trading Shepherd today and stay ahead of market volatility!